How to Steal Cookies the Easy Way
Cookies still remain one of the largest areas of computing that the average user just doesn’t understand, and there are a myriad of different ways that a hacker can take advantage of cookies to steal a user’s personal information. Cookie stealing, which is synonymous with session hijacking, allows an attacker to log into a website that is protected with a user’s username and password by stealing session data in real-time. But before we delve into the different ways of stealing cookies, we first need to understand what a session is and how cookies work.
What is a Session?
“Session” is a term in computing – more specifically, networking – that gets thrown around a lot, but it can seem like jargon to the aspiring hacker. Most concepts in computer networking are in some way related to the OSI model, which is comprised of seven different layers that map different stages and processes of data exchange between two remote computing systems. More importantly, the fifth layer is called the Session layer, and this is where the term “session” gets it’s name.
Within the Session layer of the OSI model, you’ll find common protocols such as SOCKS (a common type of proxy server connection), PPTP (Point to Point Tunneling Protocol), RTP (Real-time Transport Protocol), and others that aren’t as well known. However, when someone talks about session hijacking, they’re most often referring to a session between a client computer and a web server. In this context, “session” basically means a semi-constant exchange of information between two hosts. In contrast, consider constant exchanges through other protocols such as VPN tunnels, whereby the connection is permanent (barring technical difficulties, of course).
In a session, two computers exchange information and authentication credentials to lay the groundwork for future communications. Take Facebook, for example. After you have logged into the Facebook service, you can browse through your feed, chat with friends, and play games until you intentionally choose to log out. If a session hadn’t been built between your computer and the Facebook servers, you would need to continually login again and again every time you wanted a new piece of data. Fortunately, you don’t have to, because all of your connection information is stored within a cookie.
What is a Cookie?
Cookies are small repositories of data that are stored within your web browser by a web server. They are rife with security concerns, and some of them can even track your online activity. Whenever you visit a web site, the cookie stored in your browser serves as a type of ID card. Each additional time you login or request resources from the same web server, the cookie saved in your browser sends its stored data to the web server. This allows web site administrators, and even Internet marketers, to see which of their pages are getting the most hits, how long users stay on each page, which links they click on, and a wealth of other information.
And believe it or not, cookies are extremely prevalent these days. Have you ever purchased something from Amazon.com? If so, then you’ve used cookies before, whether you knew it or not. It’s quite common for online ecommerce sites to use cookies to record and store personal information you’ve entered, which products you’ve searched for, which items are in your online shopping cart, and other information so it doesn’t need to be tediously reentered each time you want to make a purchase.
Furthermore, cookies are used to make a website more personal. Many sites offer preference options to let you customize the look, feel, and experience of any given web service. Once you revisit the site or resource, you’ll find that all your preferences were preserved. Though cookies make browsing the web a lot more convenient, they do have a lot of security drawbacks, as we’ll discuss next.
Types of Cookies and Security Problems
 In theory, the only other online entity that can read cookies stored in your browser is the website that stored it there originally. However, it’s surprisingly easy for scripts to mine data from cookies, and there are some exceptionally dangerous types of cookies that are rife with security threats. Mainly, the types of cookies that are the most fearsome are named Flash cookies, zombie cookies, and super cookies.
Even though your browser has ways to manage cookies, some are nearly impossible to delete. The problem is that special types of cookies aren’t stored within your browser, so even if you opt for a different web browser (Firefox, Chrome, etc.), the cookie will still be active. And many of these types of cookies are much larger than the average 4KB HTTP cookies – some of them ranging to 100KB or even 1MB. If you attempt to delete the cookie but notice that it keeps coming back every time you restart your browser, you’ve discovered a zombie cookie and may need special security software to remove it.
Viewing Your Cookies and Managing Them
You might now be wondering just how many cookies you have stored in your browser, and what you can do to pro-actively manage them and avoid the disaster of having an attacker hijack your session. Just about every browser has useful extensions that allow users to manage, backup, delete, secure, and view their cookies. All it takes is a simple search through your browser’s add-ons menu, though for Firefox users, I highly recommend the View Cookies add-on.
Though you can navigate through the file system and see the cookies individually (which stored in different places by different browsers), I think the add-ons are the best way to go. Furthermore, just about every browser has code that allows users to completely disable cookies or set limitations, such as disallowing any cookies that are greater than X number of kilobytes or megabytes in size. Lastly, many browsers even have a setting that specifically disables flash cookies.
The Easiest Way to Steal Cookies
There are a number of ways that someone can steal another user’s cookies. From cross site scripting attacks to viruses embedded in seemingly harmless software, modern hackers have a lot of tools in their tool belt to hijack an unsuspecting user’s session. Many of these advanced attacks require a lot of background knowledge and expertise in networking protocols, software development, and web technologies to carry out the attack.
Unfortunately for average users, there is one place way that is easier to steal cookies than any other attack method, and that’s by using simple tools over a local LAN. But getting access to a local LAN isn’t as challenging as it may seem. You can view any of our other posts on just how easy it is to crack wireless encryption protocols, but try to imagine where the easiest place is for hackers to connect with other users over a local LAN. Can you guess where it is?
That’s right, on public Wi-Fi networks such as those found at airports and your local Internet café – heck, even a Starbucks. You don’t even need any fancy command line tools or advanced packet sniffing knowledge to steal cookies. Nope, all you need is a Firefox extension called Firesheep. Though it isn’t currently supported on Linux, it is available on Mac OS X and Windows (XP and later versions, dependent on the Winpcap package).
Firesheep
 Firesheep is a simple to use Firefox extension that leverages underlying packet sniffing technology to detect and copy cookies that are sent in an unencrypted format. If the cookie is sent across the network in an encrypted format, there’s not much this tool can do, however. But Firesheep makes it ludicrously simple to hijack a user’s session. As the extension sniffs out cookies, it populates a list of them on the sidebar of your browser in real-time. Once an unencrypted cookie has been discovered, the user (it’s so simple I doubt it’s fair to use the term hacker) simply needs to double-click on the cookie and they’ll automatically hijack the session and log in as the unsuspecting user.
Given that Mozilla is a legitimate and trustworthy organization, it’s a little odd that they wouldn’t blacklist the extension. However, Mozilla had stated that they only use their blacklist to mark code and add-ons that contain spyware and other such security threats. Since this tool doesn’t harm the user’s browser, it seems that it’s still available. But even if they did disable, attackers would still be able to use the tool since Firefox contains a feature that effectively disables the blacklist.
Packet Sniffer’s and Man-in-the-Middle Attacks
Firesheep is essentially a packet sniffing add-on that is ridiculously user-friendly. However, advanced users can take advantage of other packets sniffers, such as Wireshark, to steal cookies. However, this method is a lot harder an takes some preexisting knowledge of how to work in Firefox. We won’t detail the process of starting a Wireshark packet capture here, but we do want you to understand how they work.
Man-in-the-Middle attacks and DNS based attacks are very common, and they both work to redirect a user’s traffic to a computer system that the hacker controls – such as their personal computer, a server, or a networking device (router, firewall, proxy server, etc.). Once the hacker has hoodwinked the end user’s computer and/or the default gateway into sending their data to the hacker’s networking interface, the attacker can see everything that isn’t encrypted. Naturally, this includes cookies, so all a hacker would have to do is run a capture, analyze collected traffic, and pluck the cookie data out of their results before the user disconnects or logs out.
Cross-Site Scripting (XSS)
Last but not least, cross-site scripting is another popular way to steal cookies from a user. If you remember, most often only the website that stored a cookie can access it, but this isn’t always the case. Cross-site scripting works by embedding PHP (among other types) of scripts into web pages, web pages that may or may not be owned by the hacker (though often they are not).
Though security controls are always increasing, there are still a vast amount of websites vulnerable to XSS attacks. It can even be a simple website like a forum. For example, consider a forum that allows image tags. They code post a link in the image tag with code such as the following: <img src=MyBadScript.html/>
Other times, they may simply link to a web resource that contains their script. Once the script executes in the users web browser, the attacker’s code will execute and send copies of any active cookies to another location, such as their web browser or another resource.
Final Thoughts
Remember that the idea here is to learn how to protect yourself, and others, from becoming the victim of a cookie stealing attack. Though it would be simple to run Firesheep, I’d highly advise against doing anything illegal. Also remember to respect other user’s privacy.
Kali Linux Virtualbox Pentest Lab
The cornerstone to learning how to penetration test and hack is to have your own lab set up. In this scenario we will set up our own Kali Linux Virtualbox lab. If you are serious about learning then it is the very first thing you should do. The reason being is that once you get your lab set up you will be able to start running sample tests to see how they work. Every pentester has one, and reading about how to conduct penetration tests won’t get you anywhere; you will actually need to get your hands dirty.
Initially we are going to quickly put together the most rudimentary network that you can use to learn and sharpen your skills. Simplicity is key. Eventually you can add new machines to attack after we initially get set up together. The idea here is that we don’t want to become overwhelmed, so starting small and expanding is the way to go.
For now we are going to start with three machines: Kali Linux (which will be our attacking platform), Metasploitable 2 and OWASP WebGoat. We want to create a network where we have one platform for penetration testing, one platform that was built to be vulnerable and one web application that was built to be vulnerable.
Kali Linux if you don’t know is the gold standard open source penetration testing operating system created by Offensive Security. Operating systems don’t make the penetration tester, but if you are serious, Kali Linux was developed solely for this purpose and will make your life a whole lot easier. Many of the tools are built right into it.
Metasploitable 2 is a vulnerable Ubuntu Linux operating system created by the Rapid7 Metasploit Team that was designed for training purposes just like this. This will make it much easier for us to find vulnerabilities in the target machine and will allow us to get some good experience in penetration testing. We will also be much less frustrated at the beginning because we weren’t able to find any issues right away.

WebGoat is a project created by OWASP and is in the same vein as Metasploitable 2. The difference is that it allows us to test our skills out on a web application instead of an operating system. It is an amazing application because there are lessons within it and it allows you to run the tests right in the application as well. This will allow us to broaden our skills and be more ready to meet the demands of the increasing need of pentesters that can work on web apps.
After we are done our virtual network will look something like this (note that this is just an example as everyone’s network is unique):
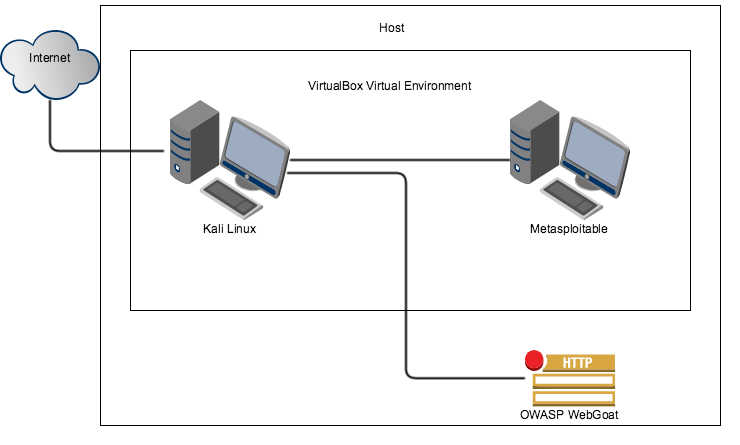
As you can see this is very simple but is all we need for right now. As stated earlier, as our skills improve so will our network.
This tutorial is going to focus on setting up this virtual lab using VirtualBox because it is free and anyone can set it up this way. There are also many other tutorials you should be able to find with a quick Google search on how to install virtual machines on any operating system or virtual setup that you might be using.
The first thing we need to do here is download VirtualBox. You can pick this Oracle product up here: https://www.virtualbox.org/wiki/Downloads
After you have installed VirtualBox we need to create a DHCP server and network within VirtualBox that we will use later.
Browse to where you have virtual box installed at the command line and type: vboxmanage dhcpserver add –netname mydhcpnetwork –ip 10.10.10.1 –netmask 255.255.255.0 –lowerip 10.10.10.2 –upperip 10.10.10.10 –enable
(Note: If you are on windows you have to append the extension “vboxmanage.exe”)
This gives us a DHCP server and 9 other IPs to play with. However, you can increase the number to whatever you like.
Now that you have VirtualBox installed we need to install our platforms (Kali Linux, Metasploitable, OWASP WebGoat).
Kali Linux
You can get your Kali Linux virtual machine from https://www.kali.org/downloads/ I suggest torrenting the download over the direct download as it is faster and I’ve had instances where the direct download was corrupted. If you’ve never torrented just go with the direct download and hope it works. When this finishes make sure that the Sha1sum matches what you see on the Kali Linux webpage. You can check this by:
Microsoft’s tool: http://www.microsoft.com/en-us/download/details.aspx?id=11533
For Mac simply type in the terminal: openssl sha1 <path to file>
Linux: sha1sum <filename>
Going forward you should always check for SHA or MD5 hashes and compare those to what they should be, as this is a prudent step to prevent malware on your computer.
The first thing we will want to do after verifying our hash is to install Kali Linux on VirtualBox. Click on New.

You can make the name of it anything you want, but will need to select Linux as the “Type”. The version you choose will either be Debian (32 bit) or Debian (64 bit) depending on what version of the Kali Linux OS you downloaded. For this example I downloaded the 32-bit version.
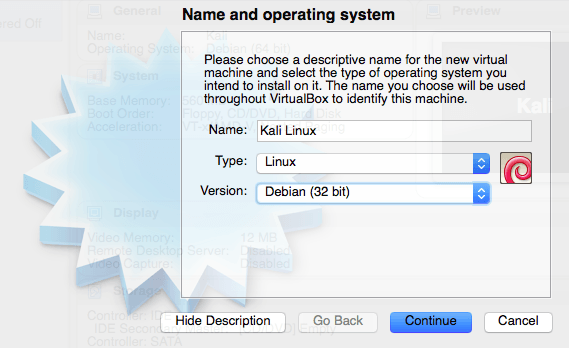
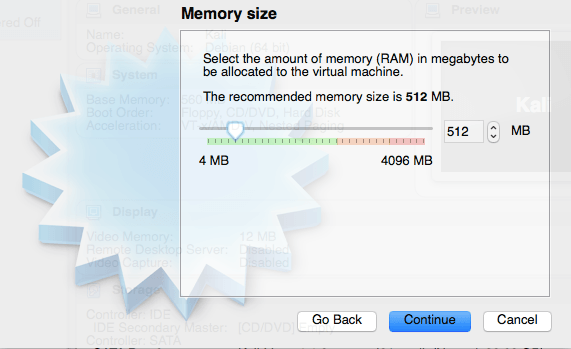
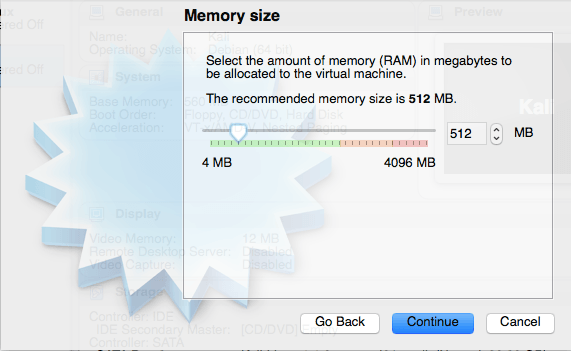
Set your memory size. While 512 is the default and you may get away with this, it is possible that you’ll get into some trouble later running certain applications so I suggest you increase it to something higher. Nothing is worse than being right in the middle of something and your Linux platform freezes. However, the beauty of VirtualBox is that you can go back into the settings and simply readjust this at any time.
We will be creating a virtual hard drive so select that and click Create.

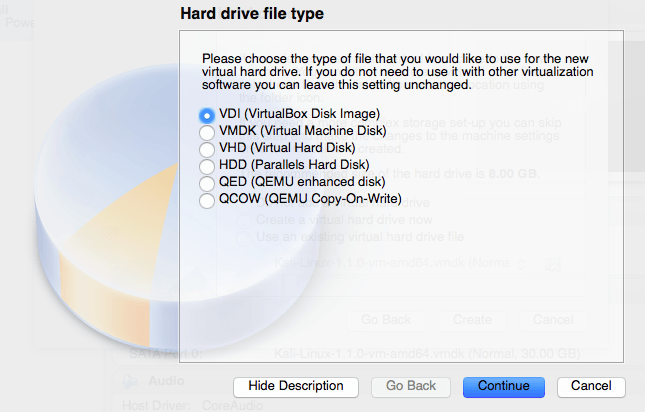
For this example we will be using the VirtualBox Disk Image.
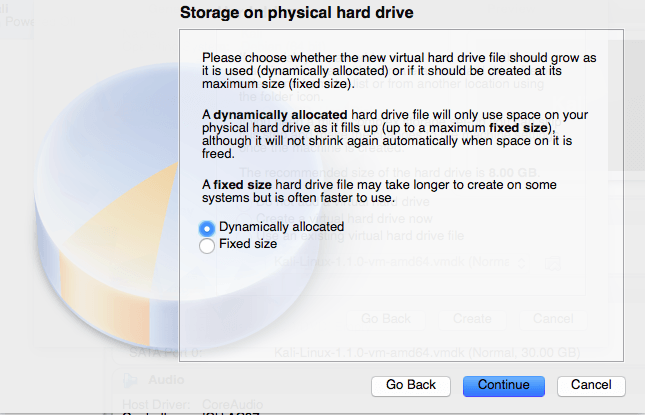
We want a Dynamically allocated hard drive for this example.
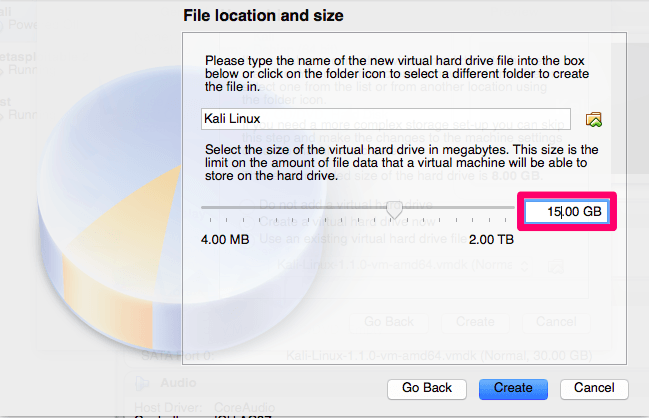
For the size you probably want to increase it to at least 15GB. I’ve had issues with the installation when going with the standard size of 8GB.
Now that we have created our new Kali Linux virtual machine we need to configure it, so select settings and then Storage.

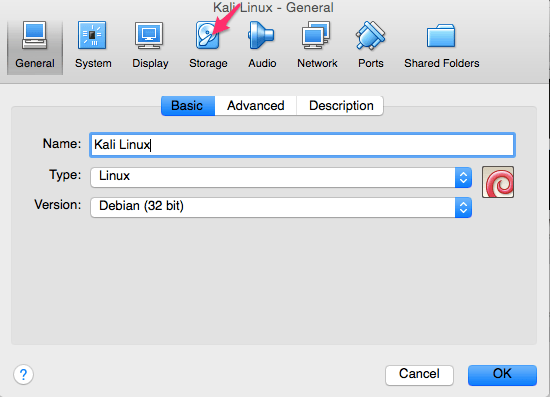
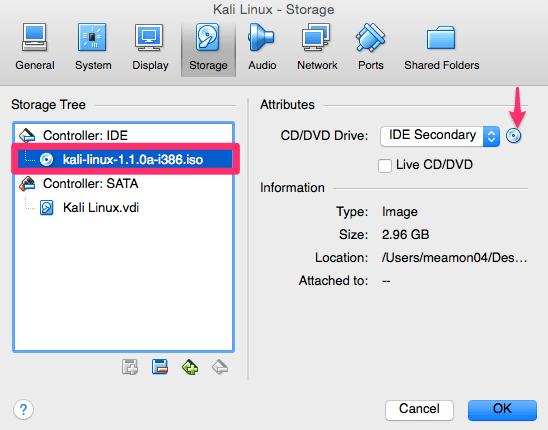
We now need to add the ISO that we previously downloaded. We do that by highlighting the area you see selected below. At first this should say “Empty”. After “Empty” is highlighted you then need to click the CD where you see the arrow below and browse/select where you have your ISO located.
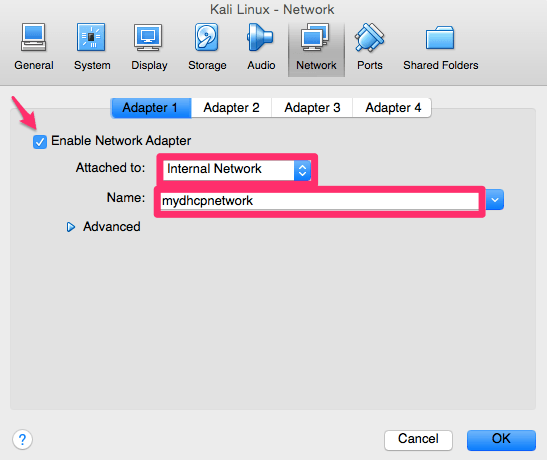
For Adapter 1 we will be using the DHCP server and network that we created earlier for our internal VirtualBox network.
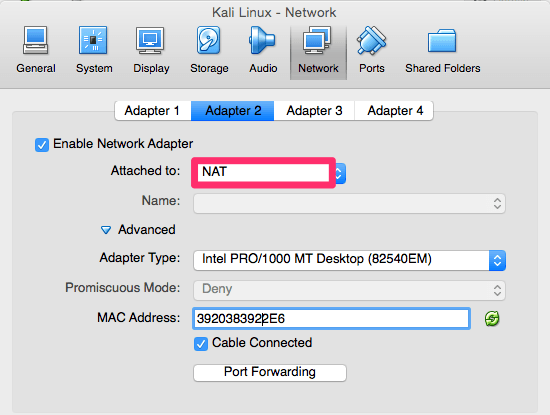
We also need our Kali Linux platform to reach the Internet, so for that we will be using Adapter 2. Attach it to NAT and then hit OK.

Highlight and now start your new virtual machine.

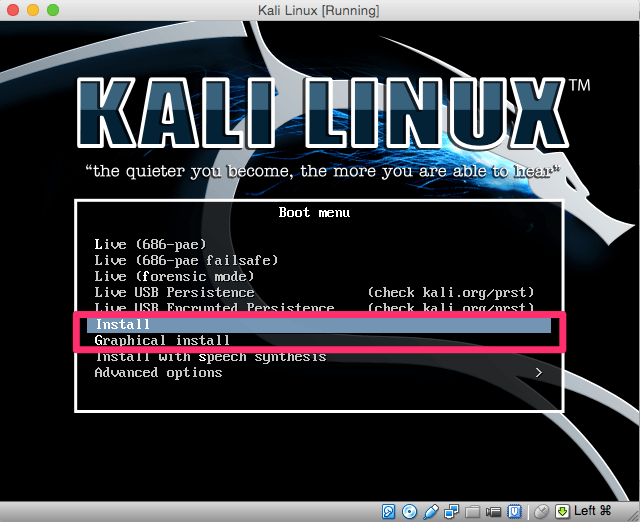
You could actually use Live below and boot right into the system, but I suggest that you actually install Kali Linux on to the virtual machine. Choose the Install or Graphical Install below and follow the steps.
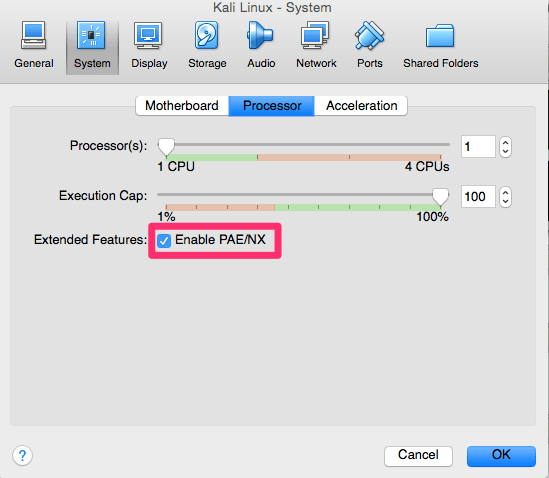
Depending on how you are installing your system and what version of the install you are using, you may encounter the following error when starting up the install:
If you get this error go back to settings, System, Processor and select “Enable PAE/NX”.
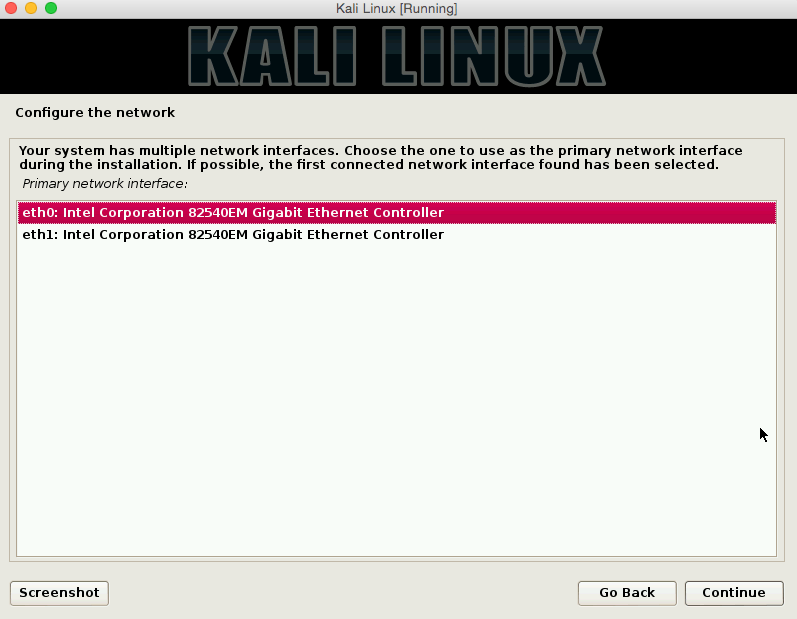
During the setup you will be asked to configure the network as well. Because we created two adapters you will see something like eth0 and eth1 below. What you will need to do here is select the interface that allows you out to the Internet. In my case this is the NAT interface we created earlier and is eth1.
After logging into your fresh Kali Linux install the first thing you will want to do is verify that you can reach the internet by opening up your web browser. If you cannot browse the web you need to enable DHCP from your command prompt with: dhclient -v
Now that everything has been set up properly we need to update Kali Linux so that we KNOW that we have the most recent distribution and tools. You can do that with the following at the command prompt: apt-get update && apt-get upgrade
Metasploitable:
Installing your vulnerable Metasploitable 2 operating system is very similar to how you installed Kali, just with fewer steps.
To start you will need to download the files from here: https://information.rapid7.com/metasploitable-download.html
Again, create a new virtual machine:
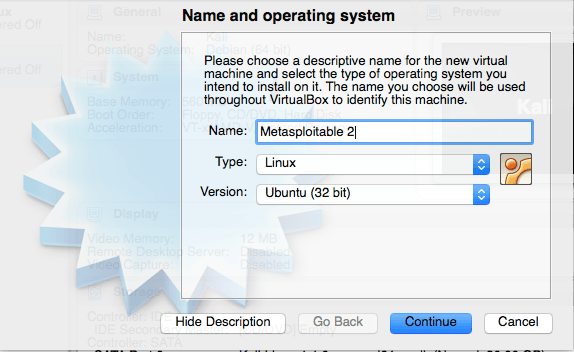
Again, set your memory size.
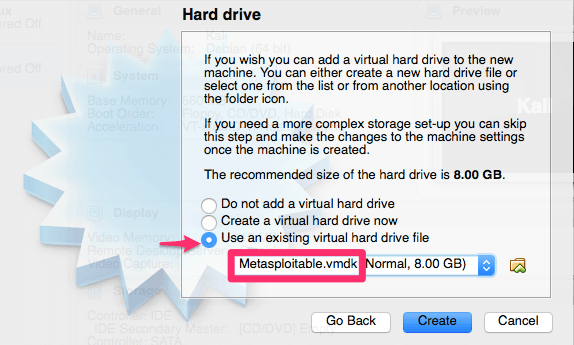
This is slightly different than the Kali Linux setup because we will be using an existing virtual hard drive as you can see below. Just select where you see the arrow and then browse to where you saved the highlighted file.
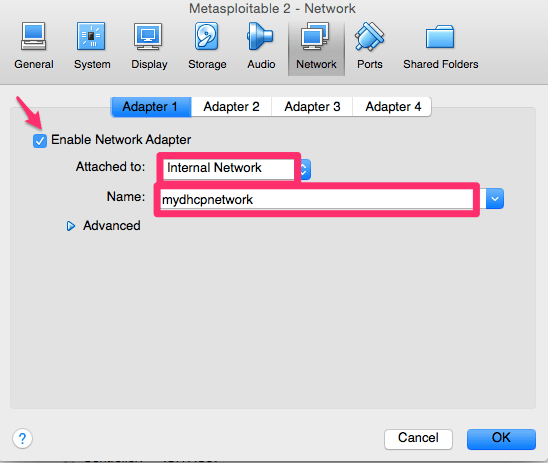
Like we did for the Kali Linux setup we will need to click on settings once again. We need to make a modification in the network section as we did for our Kali Linux platform.
Start your new Metasploitable 2 virtual machine.
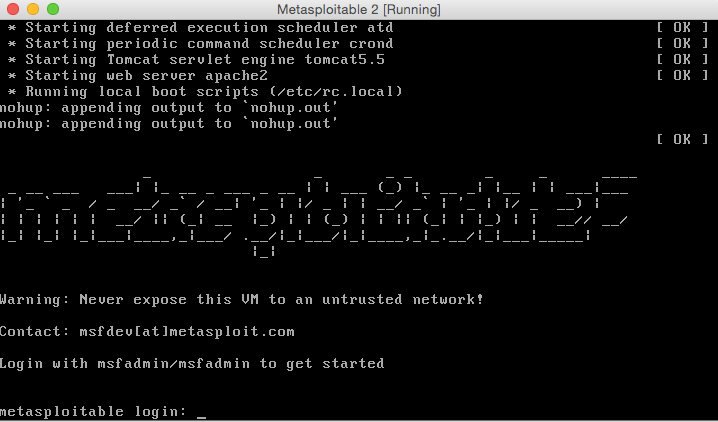
The Default username and password after you run your machine will be:
Username: msfadmin
Password: msfadmin
Password: msfadmin
OWASP WebGoat
To get the latest version of WebGoat just go to https://github.com/WebGoat/WebGoat-Legacy/releases and download the latest release at the bottom of the page.
To get started on this you will have to have the Java Platform installed on your computer first if you don’t already. You can get that here: http://www.oracle.com/technetwork/java/javase/downloads/index.html
You also need Apache Tomcat for this as well. You can find a stable release here: http://tomcat.apache.org/whichversion.html
Copy the latest version of WebGoat to your working directory and in your terminal type: java -jar WebGoat-6.0.1-war.exec.jar
(note that depending on which version of WebGoat you get at the time of reading this it could be slightly different)
(note that depending on which version of WebGoat you get at the time of reading this it could be slightly different)
To get to the login screen browse to http://localhost:8080/WebGoat with your web browser. On the login screen you will see both the guest login and admin login and password. After you log in you will be able to see all of the lesson plans:
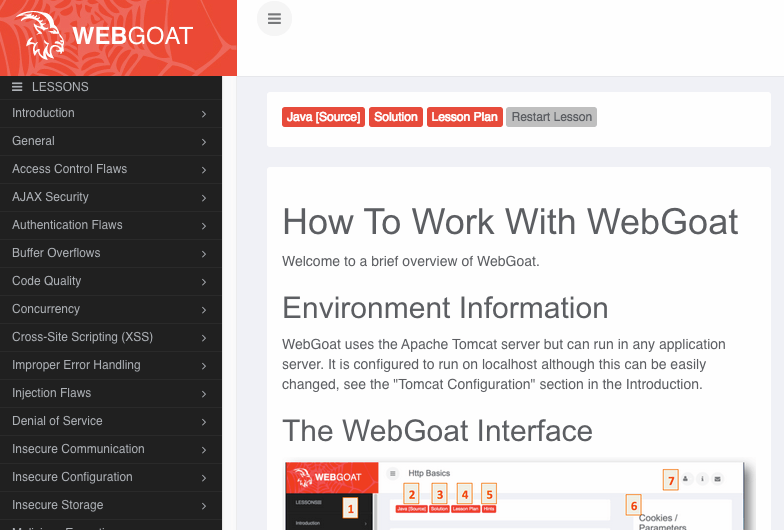
If you installed all three of these platforms then you have plenty to get you started on your journey of learning how to hack in to the information security and pentesting space.
This network is now the perfect venue for a student like yourself to test out their skills and techniques without the fear of permanently damaging or destroying your own network/systems, or someone else’s for that matter.
I’ve provided some bonus content that will help you customize this pentest lab to start the DHCP server every time, create a share drive to share files between the lab and your computer, enabling sound, securing your kali linux virtualbox machine and few other things.
Cross Site Request Forgery Attack for Web Penetration Testing
Penetration Testing
Cross Site Request Forgery CSRF Attack Explained
Cross site request forgery or CSRF attack is one of the Top Ten OWASP Vulnerabilities in a Web Application and quiet challenging during Web Application Penetration Testing . Cross Site Request Forgery is an attack that is caused if the web application allows the visitor to predict the details of a particular action .
In CSRF the attacker basically creates a Forged HTTP Request . This Forged HTTP Request forces the user to execute unwanted actions on a website that he trusts and he is currently Authenticated on . That being said , we have 2 main Requirements for a Successful CSRF Attack :
- The Victim must be authenticated in the web application and the Web Application being penetration tested must use cookies and sessions .
- The Web Application accepts the HTTP Requests from the authenticated user without verifying that the request is Unique to the User’s session .
CSRF Targets the State Changing requests such as Ticket booking , Funds Transfer , Buy from an online store etc . The forged HTTP request is sent to the victim through Social Engineering techniques .
Lets Consider the Example Attack Scenario :
The application allows a user to submit a state changing request that does not include anything secret. For example:
http://abc.com/bankapp/transferFunds?amount=30500&destinationAccount=1234567890
Now the attacker will construct a Forged HTTP Request that will transfer money from the victim’s account to any account of choice of the attacker, and then embeds this HTTP Request in an image request stored on a website under the attacker’s control:
<img src="http://abc.com/bankapp/transferFunds?amount=47840000&destinationAccount=attackersAcct#" width="0" height="0" />
Since nothing is sent in secret , the attacker can create a url of his choice easily .If the victim visits any of the attacker’s website while already authenticated to example.com, these forged requests will automatically include the user’s session info, authorizing the attacker’s request.Hence the money is transffered to the attackers account from the victims account .
So in CSRF all it takes is to make you visit a page of attackers choice (which is very easy via social engineering) , and steal money from his bank account or any other action .
Prevention of CSRF :
- Use Re authentication , CAPTCHA at state changing operations .
- Include Unique tokens in the hidden fields . This will send the request in the body of HTTP Request rather than the URL
- Always use Multi-Step Transaction in you Website .
- Append the Unique token to each link on the requested page .
Code Review : If there is no unique identifier (Unique token) relating to each HTTP request , to tie the HTTP request to the user , we are Vulnerable to CSRF Attack . Session ID’s is not enough as it is sent in each HTTP request , legit or forged .
XSS Prevention Cheat Sheet for Penetration Testers
XSS is one of the Deadliest Attacks the hackers do on a web application . XSS also known as Cross Site Scripting , is an attack where the attacker injects a malicious script to perform a malicious action on trusted websites . This Malicious script executes on the browser , and affects the visiting user .
XSS is quiet prevalent in the websites where the user input is not encoded or escaped .
Cross Site Scripting (XSS) is of 3 Types :
- Stored XSS
- Reflected XSS
- DOM Based XSS
For more info on XSS please refer to this Link .
XSS Prevention Cheat Sheet
XSS is best prevented while coding an Application . Here are some Prevention techniques for XSS :
- Escape all user Input and Output .
- Escape All Special Characters .
- Internet Explorer has an Attribute HTTP-Only that can be set for the cookies to prevent stealing of of cookies and avoids access to cookies by any script . This is Output Validation instead of input Validation .
- Escape all untrusted data based on the Body , Attribute , Javascript , CSS and URL .
- White-List input validation is an excellent strategy for the prevention of XSS . Here we define a list of Allowed input by the user . Any input which is not as per the allowed white-list (which is just the allowed regular expressions) is not taken as an input and simply rejected .
- Use of OWASP Auto-Sanitization library is highly recommended .
- To prevent XSS also use Anti-Sammy or Java HTML Sanitizer Project (also from OWASP)
- Use OWASP Content Security Policy .
- Output Validation is a must thing . Otherwise without proper escaping or validation it will be treated as an active content by the browser.
- Build a good XSS Filter .
Building A Good XSS Filter
Keep in mind that no perfect XSS Filter can be made . XSS filter is just an added layer of protection . XSS filter will help to make our Application protected from vague attacks and script kiddies .
Basic Rules For XSS Filter
- Encode every data given by the user .
- If the data is not via user and arrives by a GET request , encode this data too .
- The Following data must be properly sanitized .
- URL
- HTTP Referrer Objects : HTTP Header Field that defines the address of the webpage associated with the resource requested .
- GET Parameters from a Form .
- POST Parameters from a Form .
- Windows.location : Javascript Object that can be used to get the address of the current webpage and also can be used to redirect to another web page .
- Doccument.Referrer : Returns the URL of the Document that loaded the current document .
- Document.Location : Contains the information about the current URL .
- Document.URL
- Document.URLENCODED
- Cookie Data
- All Headers Data
- DATABASE Data
- Encode all <,>,”,’
& -> &
< -> <
> -> >
< -> <
> -> >
- Use of OPEN SOURCE LIBRARIES To prevent XSS :
- PHP AntiXSS : Automatically detects encoding of data that must be filtered .
- XSS_Clean.php filter : Cleans URF Encodings and Nested Exploits .(available on Github)
- HTML Purifier : HTML library written in PHP .This will remove any malicious code from the Input . Also available as a plugin in most Php Frameworks .
- XSS Protect : This Library works by creating an HTML Tag Tree of the Webpage . This will parse all the HTML Webpage and Match all the Tags . After that it will filter interface and will filter any improper HTML Attributes .
- XSS HTML Filter : This is an XSS filter for JAVA .

No comments:
Post a Comment